


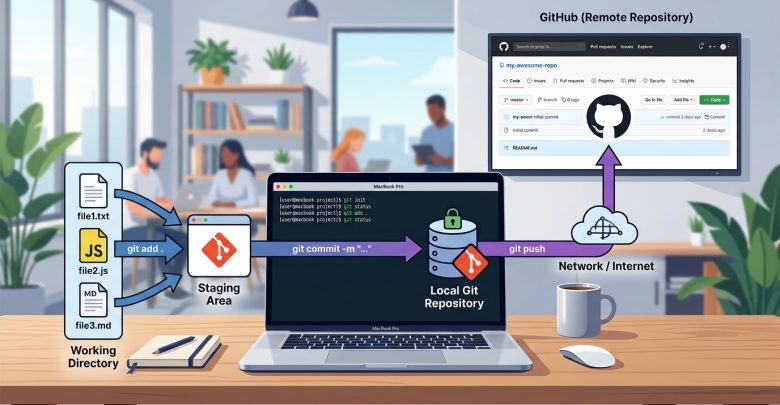
In the world of programming, understanding and managing the versions of the code and projects you work hard on day and night is essential. In this article, we will introduce you to Git and GitHub—one of the most popular version control systems used by developers worldwide. We will also cover several basic Git commands and show you how to set up a local and remote repository on GitHub using the Mac terminal.
What Are Git and GitHub?
When it comes to Git and GitHub, people often get confused and think they are more or less the same thing. However, Git is a free and open-source version control system, whereas GitHub is an online hosting platform for Git services.
Now, you might wonder what version control is. Suppose you first created a file named ABC.txt in a folder on your system. Using version control concepts, you can manage, track, commit, or revert changes to a safe previous state much more easily. Files in your local directory can be turned into trackable files using Git commands.
Why Is Version Control Important?
When coding, making mistakes is a natural and common human occurrence. Without version control, finding yourself in a position where you want to revert to an original state would be impossible if you lost those changes. Version control allows us to control and track our massive files easily and quickly.
There are fundamentally three types of version control systems:
- Local version control
- Centralized version control
- Distributed version control
In this guide, we focus on local and distributed version control—using Git commands to manage and manipulate changes locally, and then pushing those files to a remote version control system hosted on sites like GitHub for distributed version control.
GitHub acts as an online server where you can create a repository, push the local repository you created on your personal computer using Git commands, create a branch, write comments, open a pull request, and much more.
Basic Git Commands
There are numerous Git commands, but here are some of the most important ones every beginner should know:
1. Git Config
This command is used to configure the user’s name and email:
Bash
git config --global user.name "Your Name"
git config --global user.email "your.email@example.com"
2. Git Init
This command is used to create a local repository of your file, allowing you to track future changes. It creates an empty .git repository inside your current directory:
Bash
git init
3. Git Status
This command is used to show untracked files in your working directory. Between your local Git repository and your files lies an intermediate area called the staging area. Untracked files are those not yet under version control and are typically displayed in red in the terminal.
4. Git Add
This command adds untracked files to the staged state from the current directory so you can record changes:
Bash
git add <filename>
# Or to add all files:
git add .
Note: For this demonstration, we created a
demoprojectfolder using themkdircommand on the Mac desktop. We created 3 files namedfile1,file2, andfile3using thetouchcommand. Initially, runninginitmakes them untracked (displayed in red). To track them, we usegit add, after which they appear in green.
5. Git Commit
This command commits the changes in your files to the local Git repository:
Bash
git commit -m "your commit message"
6. Git Log
This command is used to view the history and commits of your files:
Bash
git log
(The hash code displayed uniquely identifies the commit along with the author’s name and timestamp.)
7. Git Diff
Suppose you have a file, save some changes hoping they are correct, and close it. When you reopen it, you realize the changes didn’t work as expected and want to see what you modified. You can find out using Git Diff:
Bash
git diff
8. Git Checkout
Once you have reviewed the changes and want to revert to a previous state, this command is used.
9. Git Remote Add Origin
This command is used to connect your local Git repository to your GitHub account repository:
Bash
git remote add origin <your-repository-url>
10. Git Push -U Origin Master
This command pushes your local repository to the remote repository created on GitHub using the -u flag:
Bash
git push -u origin master
Setting Up GitHub and Pushing Your Local Repository
- Go to https://github.com/ and create an account by providing a username, email, and password if you don’t already have one. Once done, verify your email address.
- You will be directed to a landing page where you can click the
+sign in the top right corner and select New repository. - Follow the instructions to create your repository.
- Now, to push your local repository to GitHub, copy the repository URL provided in the red box on GitHub and use
git remote add origin <URL>in your terminal. - Next, run
git push -u origin master. This may prompt you for your GitHub username and password (or personal access token). Enter them and press Enter.
Your local repository is now successfully uploaded to the GitHub server, and you can view your pushed files by visiting your GitHub account profile.
#Git #GitHub #VersionControl #WebDevelopment #Programming #MacTerminal